A Guide to Using the Dashboard
I. Navigating the Dashboard
The navigation bar is located to the left of every page. Clicking on any link from the navigation bar will redirect you to a new view.
Figure 1: Navigation bar

Currently, users can navigate to the following views:
II. Dashboard Views
1. Home
The
Home viewprovides a comprehensive summary about live devices ( runningcode engineinstances) on the network, along with the programs these devices may be executing.
1.1 List of Devices
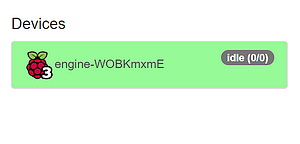
Available devices can be seen from the Devices panel, along with the device's status (one of idle, busy, or dead).
Figure 2: List of devices
1.2 Device Details
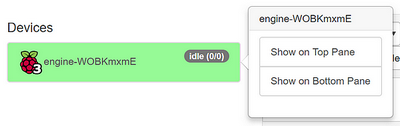
Clicking on a specific device will give users the option to view details about the device on the bottom or top pane located to the right of the page.
Figure 3: Selecting a device to view further details
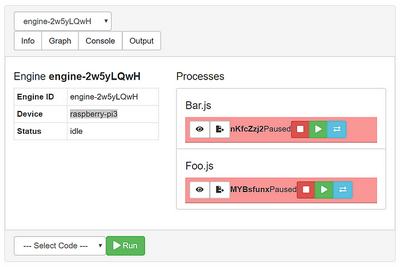
Details include what programs the device is running, any device outputs to console, graphs of the device's resource usage, and general information about the device such as the device type and device id.
Figure 4: Detailed device pane
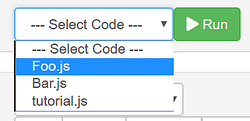
1.2.1 Running Code on a Device
To run code directly on a device, have the device selected in the detailed device pane. Then, select the code you want to execute on the device before clicking run. You may only select code from the \codes directory at this time.
Figure 5: Running code on a device
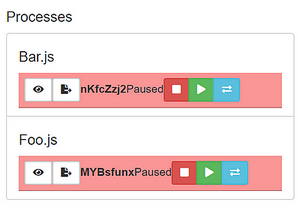
Once the code successfully launches on the device, you can 
kill, 
pause, or 
migrate the process.
Figure 6: Additional options for running programs
2. Schedule
The
Schedule viewprovides a time-based overview of events in the system. It also allows users to control application instances, as well as launch new ones.Note: This view assumes there is a running
Schedulerinstance on the network. Otherwise, some parts of this view will be missing.
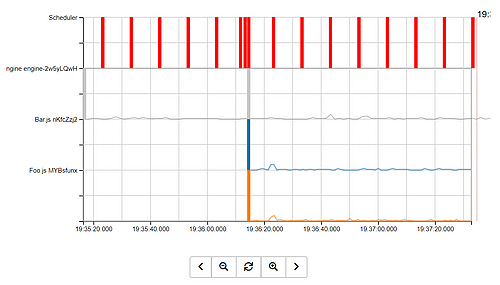
2.1 The Time-Based Events Graph
The graph shown on the page provides users a timeline of events that have occurred in the system. Red bars indicate when the Scheduler has been invoked.
Users can minimize or maximize the graph, click on a specific point in time, or navigate forwards and backwards in time.
Figure 7: A graph of events in the system
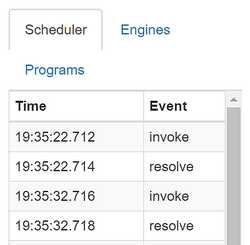
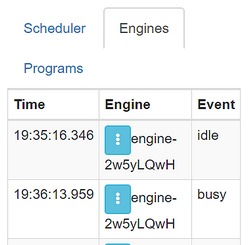
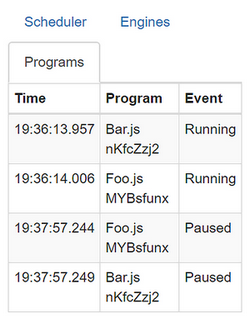
2.2 Type of Events
The events displayed on the graph can be further broken down into separate categories: Scheduler, Engines, and Programs.
To see the phases of the scheduler, select the Scheduler tab
Figure 8a: Scheduling phases
To see device events, select the Engines tab
Figure 8b: Device events
To see program events, select the Programs tab
Figure 8c: Program events
2.3 Application instances
All launched applications can be viewed on the top right of the page. Users have the option to pause, resume, or kill these launched applications by pressing the appropriate button underneath the specific instance.
Users can also launch a new application by selecting a prototype that has already been created (to create a new application prototype, take a look at the Applications view).
Figure 8d: Application instances
3. Applications
The
Applications viewallows users to define and save their ownThingsJS applications, which can later be scheduled on available devices.
3.1 Creating a New Application
A form is provided on this page to create a new application. The steps for creating an application are as follows:
Provide a name for your application
Browse through the filesystem and select components (code) to include in the application
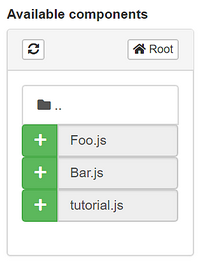
Figure 9: Selecting components for an application
For each component, specify the number of instances of that component, and the component requirements (e.g. required memory)
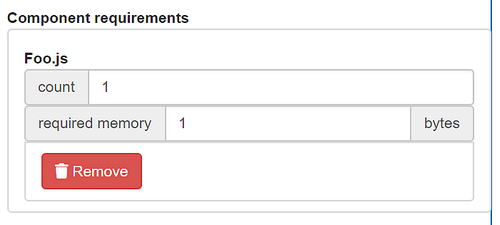
Figure 10: Component requirements
Click
 when you are finished
3.2 Existing Applications
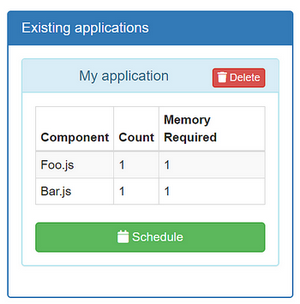
Users can view existing applications on a dropdown list to the right of the page under Existing Applications.
Clicking on an application in the list will expand the panel with application details:
Figure 11: Details for an existing application
3.3 Scheduling an existing application
Note: This task assumes that a running
Schedulerexists on the network
To schedule an application, select an existing application and expand on its details. There will be a Schedule button. Clicking on it will send a new request to the Scheduler.
If an application is successfully scheduled, a notification will appear on the screen:
Figure 12: Scheduling success

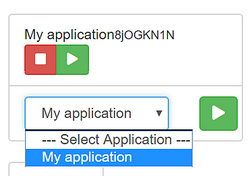
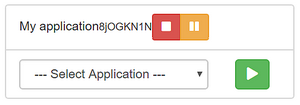
If you do not need to view the application details before scheduling, users have the option of simply selecting an existing application by name and clicking the run button to send the application request (available on the bottom right panel). From this panel, users can also control launched applications.
Figure 13: Controlling applications
4. Files
The
Files viewprovides an interface to theThingsJS filesystem.
4.1 Filesystem Navigation
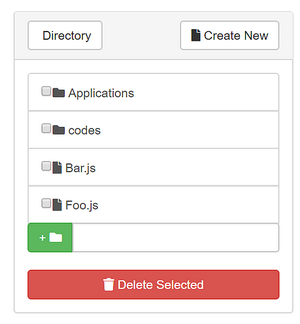
Users can navigate the filesystem using the Filesystem Navigator, which can be found to the right of the page. Files are indicated by a file icon, while directories are indicated by a folder icon.
Figure 12: Filesystem navigator
Clicking on a file will bring the file up on the text editor to the left of the page. Clicking on a directory will bring the user inside the folder.
4.1.1 Current Directory
Users can view the current directory at the top of the page. Any files or folders created will be made to the current directory.
Figure 13: The current directory

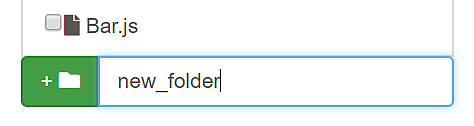
4.2 Creating a New Directory
To create a new directory, type the directory name in the input field of the Filesystem Navigator. Then, click the green button beside the input field when complete.
Figure 14: Creating a new folder
4.3 Creating and Saving Files
To create a new file, click the Create New button located to the top-right of the page. This will clear any existing content in the text-editor. Afterwards,
Provide a name for your file
Fill the content of your file by writing inside the text editor
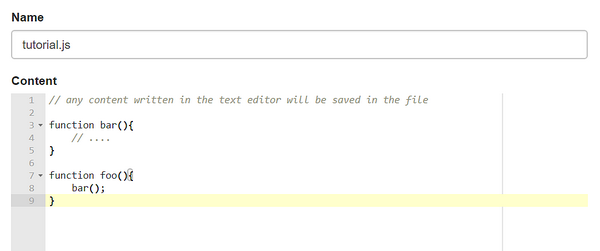
Figure 15: Writing a file
When complete, click the
savebutton located at the bottom of the page
Your new file will be made visible in the Filesystem navigator once it has been successfully saved.
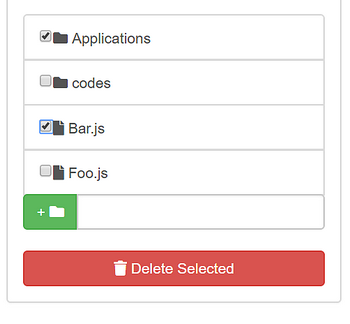
4.4 Deleting Files and Folders
Delete files and folders by selecting them through the Filesystem navigator. When complete, click the Delete selected button. They will disappear from the navigator once successfully deleted.
Figure 16: Deleting files and folders